Transfering your Domain Register: Not a walk in the park
This morning I started what I thought would be an easy 1,2,3 click domain register change. Well, for anyone who has never transferred their domain registration before, there are a lot of details that are by no means obvious and completely left out of the instructions on websites. Makes you think they don’t want you to transfer your domain (well yes, that is probably exactly it).
12 hours later I figured it out and it was a relatively quick, yet filled with “red-tape” process.
I thought I’d share the easy way with some straightforward steps below just in case you find yourself with a similar perplexity.
This is specifically for transferring your domain registration from GoDaddy to Dreamhost. Although it should help for any GoDaddy outgoing or Dreamhost incoming situations.
Step 1: In your Dreamhost panel’s sidebar, under Domains, click on Reg. Transfer. You will see a box, with a placeholder domain name in it. Replace that with the name of your domain that you want to transfer, without the www
STOP, don’t click the Request Transfer… button just yet.
Step 2: Carefully read the requirements that have to be in place before requesting the transfer. These are located at the top of your current page (one important requirement is left out, which is addressed below in Step 6).
Now comes the unpleasant walk through GoDaddy’s unfriendly UI…
Step 3: Sign into your GoDaddy account.
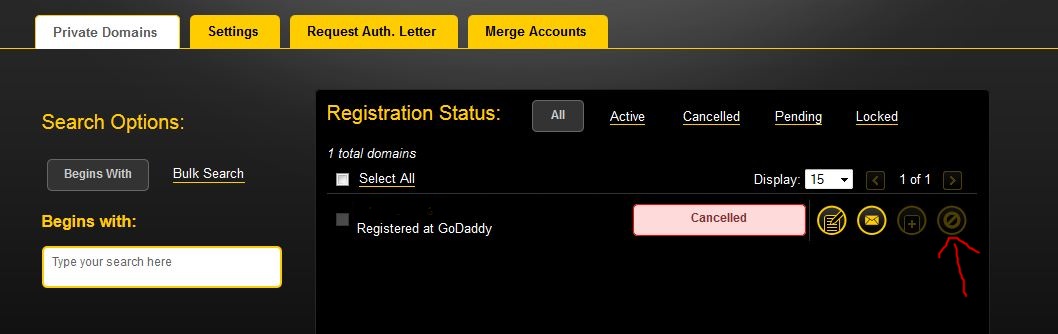
Step 4: Click on the green Launch button next to the DOMAINS option on the page you are taken to after logging in, as shown below.

Step 5: Go through the list from Step 2, specifically…
- Is your domain locked? If yes, click on the green check mark under the column Lock (seen below). It will change into an Edit button, click on it and a popup window will appear where you can change the setting to Off. Press Save.
- (Optional) Do you want to change your nameservers? If yes, click on the domain name link under Domains in the image below. You will be brought to a pretty simple page where your nameservers are listed. Click on Manage and a popup will appear with an edit nameservers link. You will usually have two. If changing them to the ones at Dreamhost, you will use ns1.dreamhost.com and ns2.dreamhost.com respectively.
- Do you have access to your admin contact email (this is the one from GoDaddy)? This is whatever you used to sign up with originally.

Here comes the step no one tells you about. -_-
Step 6: Did you sign up for a private WHOIS via Domains By Proxy (what GoDaddy uses for domain contact info masking)? If yes, you have to cancel this service before going any further. If you don’t, the transfer will fail, but you won’t know it failed. You’ll just be redirected to Dreamhost’s “Req. Transfer” page as though you never even requested a transfer and are trapped in some sort of twilight zone time loop.
Once you log into: https://www.domainsbyproxy.com you will see the menu below. Click the cancel button and follow the instructions to remove the service (login credentials are completely separate from your GoDaddy ones). You should probably confirm that your privacy service is no longer active in your GoDaddy Domain area, shown in Step 5, under the Privacy column.
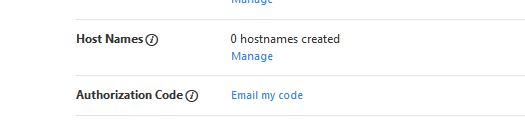
Step 7: Retrieve your domain transfer Authorization Code (or EPP code) from GoDaddy. You want to get to your Domain Details page. This is the same one you went to if you changed your nameservers. Click on your domain name link in the list as shown in step 5. At the bottom of the page there will be a link that says Email my code. Click on that and you will get a popup saying which email it is going to send it to. Press Send. Your authorization code may have odd characters in it like a / or a : near the beginning and you will wonder if you want to use the whole thing. You do.
Step 8: Go back to Step 1, you may now press the button!

Step 9: Follow the instructions that follow. If you changed your nameservers to the dreamhost ones in Step 5, you will want to select “Use DreamHost’s nameservers” otherwise copy and paste the ones located on your Domain Details page on the GoDaddy site.
We’re almost there!
Step 10: As long as you get a nice Dreamhost confirmation page after you put in your payment information you are all set (if not something went horribly wrong). Keep checking the email you have registered with GoDaddy to confirm all transfer requests. The transfer can happen very quickly. Mine went through after an hour (not the 7 to 10 days stated in the Dreamhost instructions).
I hope this guide helped others, like myself, that were struggling with this transfer process.